Showing posts with label Cyclic zugzwang. Show all posts

Sunday, 2 November 2025

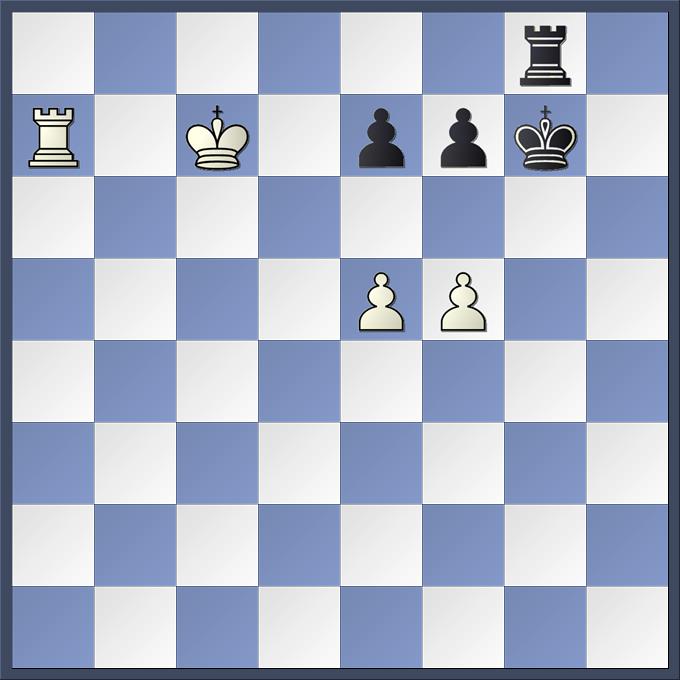
The Fahrni-Alapin Position

Who discovered first this famous position with a stunning winning manoeuvre? Fahrni and Alapin? Em. Lasker? Kling and Horwitz? Chapais? I have a new answer to this question!

White wins even on the move!

Fahrni, in his book Das Endspiel im Schach (Leipzig, 1917), gave this as a position from a game Fahrni-Alapin without giving more details. In the later chess literature, the game was sometimes referred to as Fahrni-Alapin (1912), but no game score ever surfaced.

In 1905, a game between Paul Fiebig and Savielly Tartakower reached this position after black's 54th move:

The game continued with the moves

55. a5 bxa5 56. bxa5 Kd7 57. c5 Kc7 58. c6 Kc8

In this winning position, a disappointing draw followed...

59. Kd6 Kd8 60. Kd5 Kc8 1/2-1/2

Emanuel Lasker gave some lectures in London in 1895, and a book based on those lectures was later published by him: Common Sense in Chess (London-Berlin, 1896). The position from page 108 is familiar:

He gives the following analysis: "White has two chances of winning, the one based on his passed Pawn, the other on the weakness of the black RP. The black K occupies at present a position of advantage in regard to both. This is changed by the following manœuvre:"

1. Kd5 Kc8 2. Kc4 Kd8 3. Kd4 Kc8 4. Kd5 Kc7 5. Kc5

The famous book by Joseph Kling and Bernhard Horwitz, Chess studies or Endings of Games (London, 1851) already contained a similar position:

They gave the following solution:

1. Ke5 Kd8 2. Kd4 Kc8/Ke8) 3. Ke4 Kd8 4. Ke5 Kd7 5. Kd5 and wins. "White, by the mode of play adopted, gains either the opposition and wins with the Queen's Pawn, or else gains the Black Pawn, and then wins easily."

Actually, White doesn't need this fancy manoeuvre to win in this position, in the 1884 edition of the book, "another useful solution" is given:

1. Ke5 Kd8 2. d7 Kxd7 2... Kc7 3. d8=Q+ +- 3. Kd5 Kc7 4. Ke6 Kc8 5. Kd6 Kb7 6. Kd7 Kb8 7. Kc6 Ka7 8. Kc7 Ka8 9. Kxb6 and wins.

By the way, this solution with a pawn sacrifice wouldn't work in our original position.

Only 10 pages later, the same book contains another study featuring our position.

The solution given by the authors is quite surprising... and wrong.

1. a5 bxa5 2. Kc1 a4 3. Kd1 Kd4 4. Kc2 Kc4 5. a3 "and draws".

1. a5? is actually a blunder; the right drawing move was 1. Kc1.
3... Kd4? is another mistake; 3... c2 wins.
The biggest blunder, though, is the "and draws" part. After white's 5th move, we have the "Fahrni-Alapin Position" on the board, only with reversed colours!

This position is a win, not a draw, and the winning method was given by the authors in their previous composition 10 pages earlier... Of course, Kling and Horwitz were geniuses, but pawn endgames can be so tricky sometimes.

Our time travel doesn't end here. Von der Lasa, in 1862, published the first position from an old French manuscript by "Chapais" (probably a pseudonym). This truly remarkable manuscript of an endgame book Essais Analytiques sur les Echecs was probably completed in 1777 by the mathematician Gaspard Monge. Last year, Herbert Bastian published the book Chapais – Das revolutionäre Schachmanuskript von Gaspard Monge (Berlin, 2024), presenting the whole content of the MS.

One remarkable discovery is that "our position" was already in the Chapais MS! Here's the analysis from the manuscript:

White wins whoever is on move

1. Kd5 Kc8 If 1... Kd8 or 1...Kb8 then the white king goes to d6 already on the second move. 2. Kd4 If 2. Kd6 then 2... Kd8, and the checkmate will be delayed. 2... Kd8 If black returns 2... Kc7, white immediately gets the zugzwang by 3. Kc5, and from there, it penetrates through b6 and wins more quickly; 2... Kb8 is answered by the same 3. Kc4 3. Kc4 Kc8 4. Kd5 Kd8 5. Kd6 Kc8 6. c7 This is the moment when White must advance the pawn. The pawn must reach the penultimate rank without a check to avoid a draw or a stalemate. It can be observed that White's preceding king march was steered towards this goal. 6... Kb7 7. Kd7 Ka7 8. Kd8 Kb7 9. c8=Q+

Our journey is not over yet! Today, I have discovered an even earlier source for this endgame.

Giambattista Lolli, in his book Osservazioni teorico-pratiche sopra il giuoco degli scacchi (Bologna, 1763) pp. 489-499, has a lengthy analysis of the following position:

He concludes that White wins whoever is on move. White has two winning methods.

The first is a nice breakthrough: 1. Kd5 Kd7 2. f6! gxf6 3. g6! hxg6 4. h6! +-
The second method starts with the pawn push 1. g6.

He is also analyzing the two other possible pawn pushes, which lead only to a draw: 1. h6? and 1. f6?.

1. h6? is easy to prove to be a draw, but for 1. f6? "it is necessary to act with great circumspection, as one must sometimes handle the King contrary to the rules suggested for King against King and Pawn, because here both Kings have an extra Rook's Pawn that they can move..."

After the moves 1. f6+? gxf6+ 2. gxf6+ Kf7 3. Kf5, he reaches the following position:

Now, black has to be very careful. The natural retreat 3... Kf8? loses after 4. Ke6 Ke8 5. f7+! Kf8 6. Kf6, and there is no stalemate. One must choose 3... Ke8! (or 3... Kg8!) to draw. Then 4. Ke6 Kf8 5. f7 h6 6. Kf6 is a stalemate.

He also proves that 3... h6?, which leads to a mirrored Fahrni-Alapin Position, loses.

His main line is 4. Ke5 Kf8 The black King "goes to f8 to opportunely face the opponent's King if he comes to e6, but White disappoints him with a subtle move like this:" 5. Kf4! Kg8 6. Ke4! "White does not go with the King to e5, because Black would go with the King to f8; nor does he go to f5, because Black would go to f7, then to his own house as above, and so the game would be a draw; But he withdraws the King to e4 to gain the move."6... Kf8 Black doesn't know what to do. 7. Ke5 Ke8 8. Ke6 Kf8 9. f7 Kg7 10. Ke7 Kh7 11. Kf6 This leads to a quicker checkmate than the move chosen by Chapais. (11. f8=Q? stalemate) 11... Kh8 12. f8=Q+ Kh7 13. Qg7#

Fahrni's book contains a similar endgame to Lolli's position, so there is a high chance that he was familiar with Lolli's analysis. Maybe he just made two nice studies out of this messy position. Or maybe there was a real game Fahrni-Alapin.

H. Fahrni
Das Endspiel im Schach
1917
White wins
1. f6! gxf6 2. g6! hxg6 3. h6! +-

A useful link about this topic: www.chesshistory.com

Tuesday, 3 October 2023

Study 192

Arpad Rusz
Chess Artistry Adventure
2023
White wins

1. Qh5+! The black king cannot be let to move to the 6th rank. Thematic try: 1. Qe6? Qf8+ 2. Kb7 Qg7+ 3. Kb8 Qg3+ 4. Kc8 Qc3+ 5. Kb7 Qg7+ perpetual check 1... Kg7 2. Qg5+ Kf7 2... Kh7 3. Qf6 +- 3. Qf5+ 3. Qd8? Kg6! 4. Qb8 Qe4+ = 3... Kg7 3... Ke7 4. Qc8 Kf6 5. Qb7 Qf8+ 6. Qb8 +- because there is no Qf3+ 4. Qe6! Back to the main plan. The threat is Qc6 followed by Qb7+. 4... Qb5 4... Qf8+ 5. Kb7 = Unlike in the thematic try, now there is no Qg7+. 5. Qd6 Kf7 5... Kh7 6. Qf6! zugzwang (6. Qb8? Qc5! 7. Qb1+ Kh6 8. Kb7 Qe7+ 9. Ka6 Qa3+ perpetual check) 6... Qb4 7. Qc6 +- 6. Qb8 Qc4! 7. Qb7+ Kg8!

Position A

This is the ideal position for the black pieces. This position was reached (with reversed colours) by Averbach in the analysis of the game Schlechter - Pillsbury (Vienna, 1898). He couldn't prove the win, but later a winning method was discovered by Stalyoraitis (1980). I could prove that the method is unique in the sense that reaching Position B is essential to win.* The game Veselovsky - Bebchuk (USSR, 1977) also could have been decided by this, but it has ended in a draw. A flawed analysis of that game appeared in Benko's Laboratory (Chess Life, April, 1982). being my starting point to create this study. 8. Qd7! The shortest way to win. The other moves are time-waisting duals which all lead to the same key position. 8... Qe4+! 9. Kb8! Qf4+ 10. Kc8 Qc4+ 11. Kd8 Qh4+ 12. Qe7 Qd4+ 13. Kc8 Qc4+ 14. Kb8 Qb5+ The black queen cannot stay any longer on the 4th rank. 15. Qb7 Qe5+ 16. Ka8! Qc5

Position B

Unfortunately for black, the ideal position of its pieces couldn't be reached anymore. The black queen is on c5 instead of c4, and that allows the following check: 17. Qb3+! 17. Qd7?! Qf8+ The position is still a win but white has to work hard to reach again the key position (B). A similar check will not be available at the end of the main line because the black king will be on f8. 17... Kf8 The best chance is to stay on the 8th rank because there is no time to run with the king to the lower half of the board. 17... Kh8 18. Qh3+ (18. Qb7? Qc3! = mutual zugzwang) 18... Kg8 19. Qe6+ Kh8 20. Qe8+ Kg7 21. Qd7+ Kh8 22. Qd8+ Kh7 23. Kb7 +- 18. Kb7 Qe7+ 19. Ka6 Qd6+ 20. Qb6 Qd3+ 21. Kb7 Qd7+ 22. Ka8! Qd5+ 23. Kb8 Qe5+ 24. Kb7 Qe4+ 25. Qc6 Qe7+ 26. Kb8 26. Ka8?! Qd8+ 26... Qb4+ 27. Ka8! and black quickly loses because there is no check on the 8th rank. For example: 27... Qf4 27... Qb3 28. Qc8+ Kf7 29. Qb7+ +- 28. Qc8+ Kg7 29. Qb7+ Kh6 30. Qc6+ Kh5 With the black king on the 4th rank, the position would be draw. 31. Kb7 Qb4+ 32. Ka6 Qa3+ 33. Kb6 Qb3+ 33... Qe3+ 34. Qc5+ +- 34. Qb5+ and wins.

*Proving that Position B is essential for the winning process was done using the Haworth Method. In the normal QP v Q tablebase both positions are wins. By regenerating the tablebase from scratch with a 'seed' (Position B set a priori to DRAW), one can see if that causes a change of the evaluation for Position A as well (to DRAW) proving that the two positions depend on each other.

Watch this study on a dynamic board! Click here!

You can analyze the study with the help of the Syzygy tablebases here.

Update

The following study also features Stalyoraitis' position.

Peter Krug
EBUR
2006
White wins

1. Qe8+ Kg7 2. Qd7+ Kg6 3. Qd3+ Kg7 4. Qg3+ Kf8 5. Qb8+ Kg7 6. Qc7+ Kg6 7. Qc4 Qf3+ 8. Kh2 Qe3 9. Qf1 Qe5+ 10. Kh1 Qh8+ 11. Kg2 Qa8+ 12. Kg1 Qa7+

13. Kh1! Qd7 14. Qf2 Kh5 15. Qe2+ Kg6 16. Qe4+ Kh5 17. Qc4 Qa7 18. Qe2+ Kg5 19. Kg2 Qd4

Cyclic zugzwang

20. Qf2 Qe4+ 21. Qf3 Qd4 22. Qe2! We are back to the same position but with BTM. 22...Kg6 23. Qb5 Qe3 24. Kf1 Qe4 25. Kf2 Qd4+ 26. Kf3 Kh6 27. Qc6+ Kg7 28. Qc7+ Kg6 29. Qg3+ Kf5 30. Qh3+ Kg5 31. Qe6 Qd1+ 32. Qe2 Qd5+ 33. Kf2 Qf5+ 34. Kg1 Qb1+ 35. Kg2 Qg6 36. Qc4 Qf6 37. Qd3 Kh6 38. Qb5 Qg7+ 39. Kf2 Qa7+ 40. Ke2 Qd4 41. Kf3 Qf6+ 42. Ke4 Qe6+ 43. Kd4 Qd6+ 44. Kc4 Kg6 45. Kb3 Kg7 46. Ka4 Kh8 47. Qb2+ Kg8 48. Ka5 Qc5+ 49. Qb5 Qc7+ 50. Qb6 Qe5+ 51. Kb4 Qb2+ 52. Kc5 Qf2+ 53. Kc6 Qf3+ 54. Kc7 Qf7+ 55. Kb8 Qe8+ 56. Kb7 Qf7+ 57. Qc7 Qb3+ 58. Ka7 Qe3+ 59. Qb6 Qc3 60. Kb7 Qf3+ 61. Qc6 Qf7+ 62. Kb8 Qf4+ 63. Qc7 Qb4+ 64. Qb7 Qf4+ 65. Ka8 Qc4 66. a7 Kh8 67. Qb2+ Kg8 68. Qb6 Qe4+ 69. Qb7 Qc4

Stalyoraitis' position

70. Qd7 Qe4+ 71. Kb8 Qf4+ 72. Kc8 Qc4+ 73. Kd8 Qh4+ 74. Qe7 Qd4+ 75. Kc8 Qc4+ 76. Kb8 Qb5+ 77. Qb7 Qe5+ 78. Ka8 Qc5 79. Qb3+ Kf8 80. Kb7 Qe7+ 81. Ka6 Qd6+ 82. Qb6 Qd3+ 83. Kb7 Qd7+ 84. Ka8 Qd5+ 85. Kb8 Qe5+ 86. Kb7 Qe4+ 87. Qc6 Qe7+ 88. Kb8 Qe5+ 89. Ka8 +-

If the above study is correct, then following study published in the SEE Manual becomes even cooler:

Arpad Rusz
SEE Manual
2020
White wins

The starting position is a cyclic zugzwang. In order to win, white has to reach the same position but with black to move. There is a 4-move-long cycle to pass the move which is the only way to win! 1. Qg2+ Kf6 2. Qb2+ Kf5 3. Qb1+ Kg5 4. Qf1! Black is to move! 4... Qe8+ 5. Kf2 Qf8+ 6. Kg2 Qa8+ 7. Kg1 Qa7+ We have seen this position in Krug's study! 8. Kh1! The solution given in the SEE Manual stops here. 8... Qd7 9. Qf2 Kh5 10. Qe2+ Kg6 11. Qe4+ Kh5 12. Qc4 Qa7 13. Qe2+ Kg5 14. Kg2 Qd4

Cyclic zugzwang

In order to win, white again has to reach the same position but with black to move. There is a 3-move-long cycle to pass the move. 15. Qf2 Qe4+ 16. Qf3 Qd4 17. Qe2! Black is in zugzwang! Etc.

Friday, 26 June 2020

Study 185

Árpád Rusz
Die Schwalbe
2020
3rd Honourable Mention

White wins

1. b5+! Rxb5 2. Rc6+! 2. Ra8+? Kb7 3. Kxb5 Kxa8 = 2... Rb6

3. Rg6!! mutual zugzwang 3... Ka7 3... hxg6 4. h7 Rb8 5. hxg6 +- 4. Rg7+ Rb7 5. Ka5 mutual zugzwang 5... Kb8 6. Ka6 Ka8! cyclic zugzwang - WTM. The only way to win is by reaching the same position but with black to move. (6... Rc7 7. Kb6 +-)

7. Rg5 or 7. Rg6 Rb8 8. Rf6! etc. but no 7. Rg1?! Rb1! 8. Rxb1? stalemate; 7. Rxb7? stalemate 7... Rb8 8. Rf5! 8. Re5? Rf8! = 8... Rb7 9. Rf8+ Rb8 10. Rf7 Rb7! 11. Rg7! +- cyclic zugzwang - BTM

Watch this study on a dynamic board! Click here!

Saturday, 22 September 2018

Study 156

Árpád Rusz
Pat a Mat
2017

White wins

1. Kd7 e6 2. fxe6 2. f6+? Kg6 3. Ra1 Rb8 4. Ke7 (4. Rg1+ Kf5 =) 4... Rb7+ = 2... fxe6

3. Kxe6+ White is firing the first battery. 3... Kg6

4. Ra6! White is building the second battery. 4... Rb8 5. Ke7+ Kg7

6. Ra7! The third battery is on the board. 6. e6? Rb7+ 7. Kd6 Kf6 = chameleon echo, WCCT-10 (position B) 6... Kg6 7. e6 Kg7


cyclic zugzwang - WTM

8. Kd6+ White is firing the third battery. 8... Kf6 9. Kd7! 9. e7? Kf7 10. Kd7 Re8 11. Kd6 Rb8 positional draw 9... Kg7! 10. Ke7! 10. e7? Kf7 11. Ra1 Rb7+ 12. Kd8 Rb8+ 13. Kd7 Rb7+ perpetual check


cyclic zugzwang - BTM

10... Rb1 11. Ra8! White destroys the battery. Firing the battery again would be a mistake: 11. Ke8+? Kf6 12. e7 Rb8+ 13. Kd7 Kf7 = chameleon echo 11... Rb7+ 12. Kd6 Kf6 WCCT-10 (position A) 12... Rb6+ 13. Kd7 Rb7+ (13... Kf6 14. Rf8+ Ke5 15. e7 Rb7+ 16. Kd8 Kd6 17. Rf6+ +-) 14. Kc6 Re7 15. Kd6 Kf6 16. Rf8+ +- 13. Rf8+ Kg7 14. e7 +-

Note: The manoeuvre from moves 8 to 10 was discovered by O. Frink (1926)

Watch this study on a dynamic board! Click here!

Friday, 1 June 2018

Study 150

Árpád Rusz
Jirtdan Ty
2018
Special Commendation

White wins

1. d4 Nf3 1... Ne2 2. d5 Nc3 3. d6! Nxa4 4. d7 +- 2. d5 Ne5 2... Nd4 3. Kf6 +- 3. d6 3. Ke6? Nc4 = 3... Kg5 In order to win, white has to reach the same position but with black to move.


cyclic zugzwang - WTM

4. Ke6 Nd3 5. Bb5 5. d7? Nc5+ =; 5. Bc2? Nc5+ 6. Kd5 Nd7 = 5... Nf4+ 6. Kf7! Thematic try: It is too early for 6. Kd7?! (Position X') 6... Ng6 7. Bd3? Ne5+ 8. Ke6 Nxd3 9. d7 Nc5+ = 6... Ng6 7. Ba4! 7. d7? Ne5+ =; 7. Bc6? Ne5+ = 7... Ne5+ 7... Kf5 8. Bc2+ +- 8. Ke7! White has managed to transfer the move to black. While the white king made a triangle manoeuvre (Ke7-e6-f7-e7, 3 moves) and the bishop a switchback (Ba4-b5-a4, 2 moves), the black knight walked on a diamond-shaped path (Ne5-d3-f4-g6-e5, 4 moves). These manoeuvres result in a tempo loss by white.


cyclic zugzwang - BTM

8... Ng6+ 8... Kf4 9. Kf6! (9. Ke6? Nd3 positional draw 10. Kd5 Ne5 11. Ke6 Nd3 positional draw) 9... Ke4 10. Ke6 Nd3 11. Bc2 +- pin 9. Ke6 Nf4+

10. Kd7! (Position X) 10... Kf6 10... Ng6 11. Bc2 Ne5+ 12. Ke6 +- Now d3 is not available for the knight. Please, compare it with the thematic try. 11. Kc8! Nd5 12. Bb3! 12. d7? Nb6+ = 12... Ke5! 12... Ke6 13. d7+- pin 13. Kd7! Switchback 13... Nf6+ 14. Ke7 Kf5 15. Ba2(c4,f7) tempo 15... Ke5 16. Be6 +-

Watch this study on a dynamic board! Click here!

Related study: Study 73

Friday, 5 January 2018

Study 142

Árpád Rusz
Krug-50 JT
2017
1st Special Prize
- after Bourzutschky & Konoval -

White wins

Try: 1. Rc6+? Kd7 In the following two variations black saves the game by sacrificing the knight or the rook. This provides some comfort for the fact that in the actual mainline these two black pieces are captured on their initial squares. 1... Ke7? 2. Ne3! knight sacrifice 2... Nxe3 3. Kxf4 +- 2. Rc5 2. Ne5+ Ke7 3. Nxd3 cxd3 4. Bxd3 Nxb4! knight sacrifice (4... Rf3? 5. Be4 Rg3+ 6. Kh4 Rxc3 7. Bxd5 +-) 5. cxb4 Rxb4 = 2... Rxg4+! rook sacrifice 3. Kxg4 Nf6+ 4. Kf4 Nxh7 4... Bxh7? 5. Ke5! Ng4+ 6. Kd4 +- 5. b5 Nf8! 6. Ke5 Ng6+ 7. Kf6 Kd6 8. Rc6+ Kd7 9. Rc5 Kd6 positional draw

Solution: 1. Bg8+ Kd6 2. Rc6+! rook sacrifice (2. Bxd5? Rf5+ 3. Kh4 Kxc7 =) 2... Kxc6 3. Bxd5+ Kd6! The black king triangulates! (3... Kxd5 4. Kxf4 black is in zugzwang Be2 (4... Ke6 5. Ne5 Be2 6. Ke4 +-) 5. Ne3+ Ke6 6. Ke4 +-) 4. Kxf4 Kxd5


1st cyclic zugzwang - WTM

In order to win, white must reach the same position but with black to move. The shortest manoeuvre to pass the move to black lasts 35 moves! All moves from the cycle are unique optimal moves. 5. Ne3+ (5. Nf2?! Be2 6. Kf5?! Bd3+ 7. Kf6? Bc2! 8. Ke7 Ba4 =) 5... Ke6 6. Nd1 Kd5 7. Nb2 White threatens to bring the knight to c5. 7... Bc2! 8. Kg5 Bd3 (8... Ke4 9. Kf6 Kd5 10. Ke7 Bf5 11. Kd8 +-) 9. Kf6 (9. Na4? Ke5 =) 9... Kd6 White should bring the knight to a5 before he continues the king manoeuvre. 10. Nd1! (The shortest path to a5 via a4-c5-b7 doesn't work: 10. Na4?! Be4 11. Nc5 Bc6!; If the king starts the manoeuvre too soon, its knight gets stuck on b2: 10. Kf7?! Bf1 11. Ke8 Be2 12. Kd8 Kc6! 13. Ke7 Kb5! Now, in order to win, white has to free its knight... 14. Ke6 Bg4+ 15. Ke5 Bf3 16. Kf4 Be2 17. Ke3 Bh5 18. Kd2 Bg6 19. Ke2! Quicker than the immediate 18.Nd1. It is better to lure the bishop to f5 first using a triangulation. 19... Bh5+ 20. Ke3 Bg4 21. Kd2 Bf5 22. Nd1 Now the knight is free but also the black king! 22... Kc6 23. Ke3 Kd5 24. Nb2 Bg6 25. Kf4 Bc2 and we have returned to a previous position from the main line) 10... Be4 11. Ne3 Bd3 12. Ng4 Be2 13. Ne5 Bd3 14. Nf7+ Kd5 This move blocks the a8-h1 diagonal allowing the knight to go to b7. (14... Kd7 15. Ke5 +-) 15. Nd8! Kd6 16. Nb7+ Kc7 17. Na5! (Moving immediately to c5 is wrong: 17. Nc5?! Kd6 and the white king cannot move to f5.) 17... Kd6 18. Kf7 Kd7 19. Nb7! Black is in zugzwang! 19... Be2 (The bishop cannot move to the big diagonal: 19... Be4 20. Nc5+ +-) 20. Kf6 Kc7 21. Nc5 Kd6 22. Kf5 The bishop was not on d3! 22... Kd5 23. Kf4 Bf1 This is a new cyclic zugzwang position! (23... Bd3 24. Nxd3 cxd3 25. Ke3 Kc4 26. Kd2 +-)


2nd cyclic zugzwang - WTM

White will lose a tempo by a square-shaped manoeuvre (Nc5-d7-f6-e4-c5) while the black king triangulates (Kd5-d6-e6-d5). 24. Nd7 (It is too early to bring the knight to a4: 24. Na4? Be2 25. Ke3 Bd3 White is in zugzwang! 26. Nb6+ Kc6 27. Nc8 Kc7 28. Ne7 Kd6 29. Ng8 Ke5) 24... Kd6 25. Nf6 Ke6 26. Ne4 Kd5 27. Nc5


2nd cyclic zugzwang - BTM

27... Be2 28. Na4! Bd3 29. Ke3 Black is in zugzwang! The bishop has to leave the good square from which it controls the b1-h7 diagonal. 29... Bf1 30. Nb6+ Ke5 (In the following variation we can see the drawback of leaving the b1-h7 diagonal: 30... Kc6 31. Nc8 Kc7 32. Ne7 Kd6 33. Ng6! Kd5 (33... Bd3 34. Nf4 +-) 34. Kf2 Bd3 35. Nf4+ Ke4 36. Nxd3 Kxd3 37. b5 +-) 31. Kf3! This is a waiting move to lure the bishop to d3! (The immediate Nd7 is refuted by Ke6. 31. Nd7+?! Ke6) 31... Bd3 32. Nd7+ Kd6 (Ke6 is not that strong anymore: 32... Ke6 33. Nc5+ Kd5 34. Nxd3 cxd3 35. Ke3 Kc4 36. Kd2 +-) 33. Nc5 By attacking the bishop, white wins a crucial tempo. The black king cannot go back to the fifth rank, so the bishop must control e4. That means it has to leave the d3-f1 diagonal. 33... Bf5 The bishop also takes under control the important d7 square. 34. Kf4! (34. Ke3?! would throw away all the progress we have done so far. Ke5 M111 35. Na4 Bd7 36. Nb2 Be6 37. Kd2 Bd5 38. Nd1 Be4 39. Ne3 Bd3 40. Ng4+ Kf4 41. Nf6 Bf5 42. Nd5+ Ke4 43. Ne3 Be6 44. Nc2 Bg4 45. Nd4 Ke5 46. Kc1 Kd6 47. Kc2 Bh5 48. Nf5+ Ke5 49. Ne3 Bf7 50. Kb2 Ke4 51. Nc2 Bh5 52. Nd4 Kd5 53. Ka3 Bd1 54. Nf5 Kc6 55. Ne3 Bb3 56. Kb2 Kc7 $1 57. Nf5 Ba4 58. Kc1 Kd7 59. Nh6 Kd6 60. Kd2 Ke5 61. Ke3 Bd1 62. Nf7+ Ke6 63. Ng5+ Ke5 64. Ne4 Bc2 65. Nd2 Bd3 66. Nf3+ Kd5 67. Nh2 Bc2 68. Kf4 Bb1 $1 69. Ng4 Bd3 and we have returned to the cyclic zugzwang position from the main line) 34... Bg6 35. Ke3 Kd5 (35... Ke5 36. Nd7+ now that the bishop has left f5 this move works Kd5 37. Nb6+ +-) 36. Nd7 The threat is Nb6+ 36... Bd3 37. Nf6+ Ke5 38. Ng4+ Kd5 39. Kf4 +-


1st cyclic zugzwang - BTM

Watch this study on a dynamic board! Click here!


This study is based on the following computer endgame which is the longest win for KNPPKBP:

M. Bourzutschky & Y. Konoval
EG#188
2012

"For the KNPPKBP endgame the longest win is 102 moves and there is only one record position." 1. Na3 Kg2 2. Nb5 c6 3. Nd4 c5 4. Nb5 Kg3 5. Nc7 Bc8 6. Na8 Ba6 7. Nb6 Kf4 8. Nd7 c4 9. b4 Bb5 10. Nc5 Ke5 11. Nb7 Bc6 12. Na5 Bb5 13. Kb2 Kd5 14. Nb7 Bc6 15. Nd8 Kd6 16. Nf7+ Ke6 17. Nh6 Ke5 18. Kc2 Bd5 19. Ng4+ Kf4 20. Nf2 Bf3 21. Kc1 Kf5 22. Kd2 Ke5 23. Ke3 Bg2 24. Nd1 Bh3 25. Kd2 Bf5 26. Ne3 Bd3 27. Ng4+ Kf4 28. Nf6 Bf5 29. Nd5+ Ke4 30. Ne3 Be6 31. Nc2 Bg4 32. Nd4 Ke5 33. Kc1 Kd6 34. Kc2 Bh5 35. Nf5+ Ke5 36. Ne3 Bf7 37. Kb2 Ke4 38. Nc2 Bh5 39. Nd4 Kd5 40. Ka3 Bd1 41. Nf5 Kc6 42. Ne3 Bb3 43. Kb2 Kc7 44. Nf5 Ba4 45. Kc1 Kd7 46. Nh6 Ke6 47. Kd2 Ke5 48. Ke3 Bd1 49. Nf7+ Ke6 50. Ng5+ Ke5 51. Ne4 Be2 52. Nd2 Bd3 53. Nf3+ Kd5 54. Nh2 Be4 55. Kf4 Bg6 56. Ng4 Bd3 57. Ne3+ Ke6 58. Nd1 Bc2 59. Nb2 Kd5 60. Kg5 Bd3 61. Kf6 Kd6 62. Nd1 Be4 63. Ne3 Bd3 64. Ng4 Be2 65. Ne5 Bd3 66. Nf7+ Kd5 67. Nd8 Kd6 68. Nb7+ Kc7 69. Na5 Kd6 70. Kf7 Kd7 71. Nb7 Be2 72. Kf6 Kc7 73. Nc5 Kd6 74. Kf5 Kd5 75. Kf4 Bf1 76. Nd7 Kd6 77. Nf6 Ke6 78. Ne4 Be2 79. Nc5+ Kd5 80. Na4 Bd3 81. Ke3 Bf1 82. Nb6+ Ke5 83. Kf3 Bd3 84. Nd7+ Kd6 85. Nc5 Bf5 86. Kf4 Bg6 87. Ke3 Kd5 88. Nd7 Bd3 89. Nf6+ Ke6 90. Ng4 Kd5 91. Kf4 Be2 92. Ne3+ Kc6 93. Kf5 Bd3+ 94. Ke5 Kb6 95. Nf5 Kb7 96. Nd4 Ka6 97. Ke6 Be4 98. Nf5 Bc6 99. Nd6 Ba4 100. Ke5 Bb3 101. Kd4 Kb6 102. Nxc4+ +- "Attention, please! After 9.b4!! White has to make 92 moves without moving a pawn and capturing. A surprising example of a 50 move rule exception!"

Monday, 11 December 2017

Study 134

Árpád Rusz
Dvoretsky MT
2017
Commendation

White wins

1. a7 Kf1! Black avoids moving to f3 because that square is on the long diagonal. 2. Re7! Logical try: 2. Re8? c4 3. Rb8 Rb3! 4. Rxb3 cxb3 5. Kb8 b2 6. a8=Q No check! b1=Q+ = 2... Kf2 Now white has to lose a tempo.


cyclic zugzwang - WTM

3. Rb7 Ra5 4. Rc7! 4. Kb8? Ke3 5. Rc7 Kd4 = 4... Rb5 4... Ke3 5. Kb7 Kd4 6. Rc6! (6. Kb6? Ra1 7. Rxc5 Rxa7! =) 6... Rxa7+ 7. Kxa7 +- 5. Re7 White has transferred the move to black.


cyclic zugzwang - BTM

5... Kf3 Now it was unavoidable for the black king to step on the long diagonal. 5... Kf1 6. Rb7 Ra5 7. Rb2/Kb8 +- 6. Re8! Now that the black king was lured to f3 the main plan works! 6... c4 6... Kf2 7. Rb8 Ra5 8. Kb7 Ke3 9. Rc8 Kd3!? 10. Rxc5! +- (10. Kb6? Rxa7 11. Kxa7 c4 =) 7. Rb8 Rb3 8. Rxb3+ cxb3 9. Kb8 b2 10. a8=Q+ +- The queen has promoted with check!

Watch this study on a dynamic board! Click here!

Wednesday, 18 October 2017

Study 129

Michael Byrne & Árpád Rusz
Shakhmatnaya Kompozitsia
2017

White wins

1. Ka5! 1. Kb5? Bd3+! 2. Rxd3 Rxc1 = 1... Bc2! 2. Bxa3! 2. Rxa1+? Kxa1 3. Bxa3 b2 = 2... Kxa3 3. R1xc2! 3. Rxa1+? Kb2 = fork

Main 1:
3... Ra2 4. Rc1 Rg2!


5. Rf3!!

Thematic try: 5. Rh3? Rg5+ 6. Kb6 Rg6+ 7. Kb5 Rg5+ 8. Kc4 Ka2 9. Kb4 Rg4+ 10. Kc3 b2 11. Rc2 Ka1! 12. Rxb2 Rg3+! 13. Rxg3 stalemate 5... Rg5+ 6. Kb6 Rg6+ 7. Kb5 Rg5+ 8. Kc4 Ka2 9. Kb4 Rg4+ 10. Kc3 b2 11. Rc2 Ka1 12. Rxb2 +-

Main 2:
3... Rh1


4. Rf2!!

1st thematic try: 4. Rg2? Rh3 5. Rc4 Rh5+ 6. Ka6 Rh3/Rh6(8) 7. Kb5 Rh5+ 8. Kc6 Rh6+ 9. Kd5 Rh5+ 10. Ke6 Rh6+ 11. Kf5 Rh5+ 12. Kg6 (12. Kf6 Rh6+ 13. Kg5 Rh8! 14. Kf6 Rh6+ positional draw) 12... Rb5 13. Rg3 Ka2 14.Ra4+ Kb1 15. Rg1+ Kb2 16. Kf6 Rc5 17. Ke6 Rc1 18. Rg3 Rc3 19. Rg8 Kb1 20. Ra3 Kb2 21. Rga8 Kc2 = Position X'. The white king is too far to help.

4... Rh3! 5. Rc4 5. Rxh3? stalemate 5... Rh5+ 6. Ka6! 6. Kb6? b2 7. Rf3+ Ka2 8. Ra4+ Kb1 9. Rf1+ Kc2 10. Rb4 Kc3 = 6... Rh3 6... b2 7. Rf3+ Ka2 8. Ra4+ Kb1 9. Rf1+ Kc2 10. Rb4 Kc3 11. Rb8 +- 7. Kb5 Rh5+ 8. Kc6 Rh6+ 9. Kd5/Kc(d)7 9... Rh5+ 10. Kd(e)6 10... Rh6+ 11. Ke5(7) 11... Rh5+ 12. Kf6 Rh8! 13. Kf7! 13. Kg7? Rb8 = 13... Rh7+ 14. Kg6 Rb7 15. Rf3 Ka2 16. Ra4+ Kb1 17. Rf1+ Kb2! 17... Kc2 18. Rc4+ Kd3 19. Rcc1 b2 20. Rfd1+! Ke2 21. Rb1 +- 18. Kf6! Rc7 19. Ke5! In contrast to the thematic try, there was no rook protecting the fifth rank. 19... Rc1 20. Rf3 Rc3 21. Rf8! White doesn't allow a black counterplay based on Rc8. 21... Kb1 22. Ra3! The only way to stop the pawn is by pinning. 22... Kb2 23. Rfa8 2nd thematic try: 23. Kd4? Rh3! 24. Ra7 Rh4+ 25. Ke5 Rh5+ 26. Kf4 Kb1! Black uses the poor position of the f8 rook which is obstructed by its own king. 27. Rb8 b2 = This try failed only because the rook was on the f-file so white will start a manoeuvre to reposition the rook to another file. 23... Kc2 Position X. Now the white king is closer compared to Position X' reached in the 1st thematic try.


Position X


Position X'

24. Kd4! Rd3+ 25. Ke4! White leaves the c-file open for a rook check. 25. Kc4? b2 26. Rxd3 b1=Q = 25... Rc3 26. Rg(h)8 Kb2 26... b2 27. Rg2+ Kd1 28. Rxc3 b1=Q+ 29. Rd3+ Ke1 30. Rg1+ +- 27. Kd4! Unlike the 2nd thematic try, now that the rook was repositioned from f8, this plan works.27...Rc2! Although the best square for the black rook is c1, black deliberately wastes a tempo before putting it there trying to play for a zugzwang. 28. Rga8 28. Ra4? Kb1 29. Rc4 b2 = Now we see the reason for moving the black rook to c2 instead of c7. With an unprotected rook, this pawn move wouldn't be possible. 28... Rc1 The threat 29.Ra1 had to be stopped. Now white seems to be in zugzwang but it still can win by transferring the move to black.


cyclic zugzwang - WTM

29. R3a4(5,6,7) White threatens to put a rook to the b-file. Beside occupying the first rank, this is white's other plan to win. 29... Kb1! Black aims for a fortress by trying to push the pawn. 30. Ra1+ 30. Rb7? b2 = fortress 30... Kb2 31. R1a3!


cyclic zugzwang - BTM

31... Rh1 Black has to keep the rook on the first rank. 32. R3a5(6,7) 32... Kb1 This is the last try to build the fortress. Now that the black rook has moved from c1, this move loses immediately. 33. Ra1+ +-

Watch this study on a dynamic board! Click here!